〔CKS 筆記整理〕從 Ingress 到 Gateway API:Kubernetes 流量管理架構的演進與未來
在 Kubernetes 的網路世界中,如何將外部流量引入叢集內部一直是一個核心議題。對於許多剛接觸 K8s 的工程師來說,最困惑的往往不是 Service 的概念,而是:「為什麼我 Apply 了 Ingress YAML,卻什麼事都沒發生?」
這篇文章將帶您深入探討 Kubernetes 的流量入口架構,剖析 Ingress 的設計哲學與限制,並解析下一代標準 Gateway API 如何透過「角色導向」的設計解決當前的 Ingress 架構瓶頸。
1. 為什麼需要 Ingress?解決 Service 的兩大限制
在介紹架構之前,我們必須先理解 Ingress 的誕生是為了解決什麼問題。在 Ingress 出現之前,我們通常使用 Kubernetes 的 Service (Type=LoadBalancer) 來暴露服務,但這在生產環境中遇到了兩個主要限制:
限制一:成本效益考量 (One IP per Service)
如果使用 Service (LoadBalancer) 模式,每一個微服務都需要申請一個獨立的 Cloud Load Balancer (如 AWS ELB) 和一個獨立的 Public IP。
- 問題:當您有 100 個微服務時,就需要支付 100 個 Load Balancer 的費用,這在雲端資源的開銷上相當可觀。
- Ingress 解法:Ingress 扮演了「智慧路由器」的角色。它允許您共用單一個 Load Balancer 和 Public IP,透過 L7 路由規則將流量分發給後端成千上萬個服務,大幅降低基礎設施成本。
限制二:路由功能受限 (L4 vs L7)
Kubernetes Service 主要工作在 Layer 4 (TCP/UDP),它無法理解 HTTP 協定。
- 問題:Service 無法做到「將
/api導向後端 A,將/web導向後端 B」這種基於路徑 (Path) 的路由,也無法處理 HTTP Header 修改或 TLS 憑證卸載。 - Ingress 解法:Ingress 專注於 Layer 7 (HTTP/HTTPS) 流量。它提供了 Host-based (如
api.example.com) 與 Path-based (如example.com/v1) 的路由能力,並能在入口層統一處理 TLS 終止 (Termination),將繁重的加解密工作從後端 Pod 卸載。
2. 核心觀念:內建與外掛的區別
如前所述,Ingress 解決了 L7 路由與成本問題,但其運作方式與我們熟知的 Deployment (Deployment Controller) 或 Service (Service Account Controller) 有著本質上的不同。
Ingress 的架構哲學是「核心統一,邊緣開放」。
Ingress Controller 並非內建功能
這是 Kubernetes 架構中最常見的誤區。
事實上,Kubernetes API Server 確實內建了 kind: Ingress 的 API 定義,這讓您可以直接撰寫並 Apply 這個 YAML 物件。然而,負責執行這些規則的組件(Implementation)並不存在於 Kubernetes 的核心組件 kube-controller-manager (KCM) 中。
如果您只 Apply 了 Ingress YAML 但沒有安裝對應的 Controller,該物件只會存在於 etcd 資料庫中,其 Address 欄位永遠會是空白的,無法進行導流。
為什麼 K8s 要這樣設計?因為負載平衡的實作方式相當多樣化。從地端的 Nginx, HAProxy,到雲端的 AWS ALB, GCP GCLB,每種環境都有最佳解。Kubernetes 選擇開放介面讓生態系去競爭,而非強制綁定某一種實作,這保留了極大的彈性。
真正 build-in 在 Kubenetes Controller Manager 的 controller:
- Node Controller:負責監控節點健康,當節點失聯時驅逐上面的 Pod。
- Deployment Controller:處理滾動更新 (Rolling Update) 與擴縮副本數。
- Endpoint Controller:負責連結 Service 與後端 Pod IP 的對應關係。
- Service Account Controller:自動建立 Namespace 預設的 SA。
3. Ingress 進階架構:多 Controller 共存
在 Gateway API 普及之前,Ingress 依然是目前的標準。一個成熟的叢集內,往往不只有一個 Ingress Controller。我們可能同時安裝 Nginx Ingress (處理內部流量) 與 AWS Load Balancer Controller (處理外部流量)。
為了避免「資源處理衝突」,Kubernetes 設計了 IngressClass 機制。透過在 Ingress YAML 中指定 spec.ingressClassName: nginx,我們可以明確告知系統這條路由規則該由誰來負責實現,確保多個 Controller 能在同一個叢集中穩定共存。
4. 未來趨勢:Gateway API (The Next Generation)
Ingress 雖然實用,但隨著微服務架構日益複雜,其「單一物件承載過多職責」的設計開始面臨挑戰。Gateway API 應運而生,社群將其視為 Kubernetes 網路管理的下一代標準。
4.1 Ingress 的三大痛點
為什麼我們需要 Gateway API?主要源於 Ingress 的三個結構性問題:
過度依賴 Annotation (Annotation Dependency) 與移植性差 Ingress 的 Spec 定義較為基礎,僅包含基本的路由規則。進階功能如 URL 重寫、限速、權重分流等,全部依賴
annotations。- 問題:若要設定 HTTPS 轉址,Nginx Ingress 使用
nginx.ingress...,而 AWS ALB 使用alb.ingress...JSON 字串。這導致 YAML 無法在不同環境間移植, Vendor-Lock 效應極強。
- 問題:若要設定 HTTPS 轉址,Nginx Ingress 使用
權限管理挑戰 在 Ingress 架構下,路由規則、TLS 憑證設定、IP 全部寫在同一個檔案裡。
- 問題:開發者只想新增路徑
/v2,卻必須編輯包含 TLS 憑證設定的完整 Ingress 檔案。若無意/刻意編輯憑證設定,可能導致整個生產環境 HTTPS 中斷。
這顯示了 Ingress 缺乏「職責分離」的設計。
- 問題:開發者只想新增路徑
缺乏多協定支援與跨 Namespace 限制 Ingress 原生設計緊綁 HTTP/HTTPS,對於 TCP/UDP 乃至於 gRPC 的支援度不一,並且難以跨 Namespace 共享 Gateway 資源。
- 問題範例:若架構是「統一入口 (Gateway Namespace)」指向「多個業務 Namespace」,Ingress 被迫在每個 Namespace 都建立負載平衡器,導致成本增加,或是另求解方。
4.2 Gateway API 的四大設計原則 (Design Principles)
為了解決上述痛點,Gateway API 在設計之初就確立了四大原則,這也是它優於 Ingress 的核心優勢:
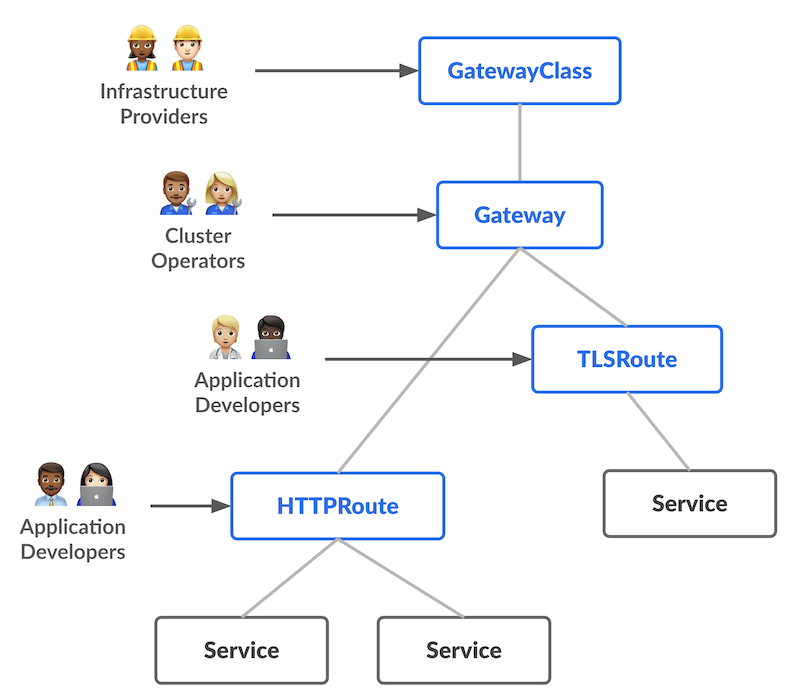
角色導向 (Role-oriented) Gateway API 將資源物件依照組織角色進行拆分,實現職責分離:
- Infrastructure Provider (基礎設施提供者):管理支援多租戶隔離的基礎設施(如 Cloud Provider),提供
GatewayClass(定義負載平衡器的類型)。 - Cluster Operator (叢集維運者):管理叢集層級的網路存取策略、TLS 憑證與監聽入口,負責
Gateway物件(定義入口監聽規則)。 - Application Developer (應用程式開發者):管理應用程式層級的路由設定與 Service 組合,專注於
HTTPRoute(定義路由規則)。
- Infrastructure Provider (基礎設施提供者):管理支援多租戶隔離的基礎設施(如 Cloud Provider),提供
可移植性 (Portable) Gateway API 的規格被定義為標準的 Custom Resources,並獲得廣泛的實作支援(包括 Nginx, Istio, AWS, GKE 等)。這意味著開發者撰寫的路由規則 (
HTTPRoute) 可以在不同的雲端或地端環境間平滑遷移,無需像 Ingress 那樣重寫大量的廠商特定 Annotations。表達力強 (Expressive) Gateway API 的資源種類 (Kinds) 原生支援了常見的複雜路由需求。例如:基於 Header 的匹配 (Header-based matching)、流量權重分配 (Traffic weighting, 用於金絲雀部署) 等。這些功能在過去的 Ingress 中,只能透過雜亂且非標準的 Custom Annotations 來實現,現在則成為了標準 API 的一部分。
高擴展性 (Extensible) Gateway API 允許在 API 結構的
不同層級掛載自定義資源 (Custom Resources)。這使得我們可以在適當的位置進行精細的客製化(例如在 Gateway 層掛載 WAF 策略,或在 Route 層掛載身分認證模組),而不會破壞核心 API 的結構。
 來源:
來源:5. 實務演練:Ingress 部署標準步驟
以下是標準的 Ingress 部署流程 (以 Nginx Ingress 為例)。
Step 1: 安裝 Controller
這一步驟只需做一次。在雲端環境建議使用 Helm 進行安裝,以利版本管理。
# 加入 Helm Repo
helm repo add ingress-nginx https://kubernetes.github.io/ingress-nginx
helm repo update

# 安裝 Controller
# 這會自動建立 LoadBalancer Service, Deployment, RBAC 等資源
helm install ingress-nginx ingress-nginx/ingress-nginx \
  --namespace ingress-nginx \
  --create-namespace
Step 2: 部署應用程式與 Service
Ingress 只能導流到 Service,因此必須先建立 Service。
apiVersion: apps/v1
kind: Deployment
metadata:
  name: demo-app
spec:
  selector:
    matchLabels:
      app: demo
  template:
    metadata:
      labels:
        app: demo
    spec:
      containers:
      - name: web
        image: nginx
        ports:
        - containerPort: 80
---
apiVersion: v1
kind: Service
metadata:
  name: demo-service
spec:
  selector:
    app: demo
  ports:
  - port: 80
    targetPort: 80
Step 3: 建立 Ingress 規則
最後,建立 Ingress 物件將流量導入 Service。注意 ingressClassName 必須正確。
apiVersion: networking.k8s.io/v1
kind: Ingress
metadata:
  name: demo-ingress
  annotations:
    # 若需要 HTTPS 自動轉址
    nginx.ingress.kubernetes.io/force-ssl-redirect: "true"
spec:
  ingressClassName: nginx # 關鍵:對應 Step 1 安裝的 Controller
  rules:
  - host: demo.local
    http:
      paths:
      - path: /
        pathType: Prefix
        backend:
          service:
            name: demo-service
            port:
              number: 80
Step 4: 驗證 (Verification)
部署完成後,我們需要測試路由是否生效。由於我們使用的是自定義 Host demo.local,因此在 curl 時必須強制指定 Host Header。
1. 取得 Ingress IP
# 等待 External IP 分配完成
kubectl get ingress demo-ingress
# 假設 IP 為 1.2.3.4
export INGRESS_IP=1.2.3.4
2. 使用 Curl 測試連線
# 測試 HTTP 連線,預期回應 Nginx 歡迎頁面
curl -v http://$INGRESS_IP -H "Host: demo.local"
6. 實務演練:Gateway API 基礎環境建置
本章節專注於 Gateway API 的基礎設施安裝與簡單連通性測試。這屬於「Day 0」的建置工作。若您已經安裝好環境,可跳至下一章的進階遷移案例。
Step 1: 安裝 Standard CRDs
目前 Gateway API 的 CRD (Custom Resource Definitions) 尚未包含在 Kubernetes 核心中,必須手動安裝。
為什麼需要這一步? Ingress 資源是 Kubernetes 早期就內建的 API,因此無需額外安裝定義。但 Gateway API 是較新的標準,尚未完全併入 K8s 核心中。為了讓 API Server 能夠理解
Gateway、HTTPRoute這些新物件,我們需要先手動擴充 API 定義。
# 安裝 Gateway API CRDs (v1.0.0+)
kubectl apply -f https://github.com/kubernetes-sigs/gateway-api/releases/download/v1.0.0/standard-install.yaml
Step 2: 安裝 Gateway Controller
如同 Ingress 需要 Controller,Gateway API 也需要實作層來真正處理流量。這裡我們選擇 Nginx Gateway Fabric 作為示範,安裝過程與 Ingress Controller 類似,建議使用 Helm 管理。
# 以 Nginx Gateway Fabric 為例
helm install ngf oci://ghcr.io/nginxinc/charts/nginx-gateway-fabric \
    --create-namespace \
    --namespace nginx-gateway
Step 3: 建立基礎 Gateway (Ops)
建立一個最基本的 HTTP Gateway 來驗證環境是否運作正常。
apiVersion: gateway.networking.k8s.io/v1
kind: Gateway
metadata:
  name: external-gateway
  namespace: nginx-gateway # 通常放在基礎設施 namespace
spec:
  gatewayClassName: nginx  # 對應 Step 2 安裝的 Controller Class
  listeners:
  - name: http
    port: 80
    protocol: HTTP
    # 僅供測試:允許所有 Namespace 綁定 (生產環境請參考第 8 章的安全建議)
    allowedRoutes:
      namespaces:
        from: All
Step 4: 部署 Hello World 路由 (Dev)
部署一個簡單的路由規則來測試連線。
apiVersion: gateway.networking.k8s.io/v1
kind: HTTPRoute
metadata:
  name: demo-route
  namespace: default
spec:
  parentRefs:
  - name: external-gateway
    namespace: nginx-gateway
  hostnames:
  - "demo.gateway.local"
  rules:
  - matches:
    - path:
        type: PathPrefix
        value: /
    backendRefs:
    - name: demo-service
      port: 80
Step 5: 驗證 (Verification)
1. 取得 Gateway IP Gateway 物件會取得一個 LoadBalancer IP。
kubectl get gateway external-gateway -n nginx-gateway
# 假設 IP 為 5.6.7.8
export GATEWAY_IP=5.6.7.8
2. 使用 Curl 測試連線
curl -v http://$GATEWAY_IP -H "Host: demo.gateway.local"
7. 進階實戰:Ingrss 遷移至 與GatewayAPI
本章節將進入「Day 1」的運維場景。我們將透過一個包含 TLS 終止、多網域路由 以及 HTTPS 轉址 的 Ingress 拆解為符合 Gateway API 角色分工的標準架構。
7.1 案例情境
假設我們目前有一個 Ingress,負責處理 example.com 網域下的兩個服務。
它的需求如下:
- TLS 終止:使用 Secret
example-com進行 HTTPS 解密。 - 路由規則:
foo.example.com/orders->foo-orders-appfoo.example.com/*->foo-appbar.example.com/*->bar-app
- 強制轉址:所有 HTTP 請求必須強制轉址到 HTTPS (透過 Annotation 實作)。
7.2 傳統做法 (The Legacy Ingress)
在 Ingress API 中,所有的邏輯(憑證、路由、轉址)都混合在同一個檔案中。
apiVersion: networking.k8s.io/v1
kind: Ingress
metadata:
  name: example-ingress
  annotations:
    # 使用 Annotation 實作 http 轉址 https (依賴特定實作,難以移植)
    some-ingress-controller.example.org/tls-redirect: "True"
spec:
  ingressClassName: nginx # 使用 Nginx 作為 Ingress Controller
  tls:
  - hosts:
    - foo.example.com
    - bar.example.com
    secretName: example-com  # 憑證設定混在路由中
  rules:
  - host: foo.example.com
    http:
      paths:
      - path: /
        pathType: Prefix
        backend:
          service:
            name: foo-app
            port: { number: 80 }
      - path: /orders
        pathType: Prefix
        backend:
          service:
            name: foo-orders-app
            port: { number: 80 }
  - host: bar.example.com
    http:
      paths:
      - path: /
        pathType: Prefix
        backend:
          service:
            name: bar-app
            port: { number: 80 }
7.3 現代做法 (Gateway API)
在 Gateway API 中,我們將上述資源拆解為 Gateway (Ops 負責) 與 HTTPRoute (Dev 負責)。
步驟一:定義 Gateway (Ops)
維運人員負責基礎設施層級的設定:監聽端口 與 TLS 憑證。這裡我們明確定義了 HTTP (Port 80) 與 HTTPS (Port 443) 的監聽器。
注意:憑證與 Key 依然儲存在 example-com Secret 中,但現在由 Gateway 統一管理,開發者無需觸碰。
apiVersion: gateway.networking.k8s.io/v1
kind: Gateway
metadata:
  name: example-gateway
spec:
  gatewayClassName: nginx # 對應前面安裝的 Nginx Gateway
  listeners:
  # 1. HTTP 監聽器 (用於轉址)
  - name: http
    port: 80
    protocol: HTTP
    hostname: "*.example.com"

  # 2. HTTPS 監聽器 (負責 TLS 終止)
  - name: https
    port: 443
    protocol: HTTPS
    hostname: "*.example.com"
    tls:
      mode: Terminate
      certificateRefs:
      - kind: Secret
        name: example-com  # 憑證由 Ops 在此處管理
步驟二:拆分路由規則 (Dev)
開發人員只需專注於路由邏輯。我們將原本複雜的 Ingress 規則拆分為兩個獨立的 HTTPRoute,分別對應 foo 與 bar 團隊。
Foo 服務路由 (foo-route.yaml)
apiVersion: gateway.networking.k8s.io/v1
kind: HTTPRoute
metadata:
name: foo
spec:
parentRefs:
- name: example-gateway
sectionName: https # 明確綁定 Gateway 的 HTTPS 監聽器
hostnames:
- foo.example.com
rules:
- matches: 
https://gateway-api.sigs.k8s.io/
- path: { type: PathPrefix, value: /orders }
backendRefs:
- name: foo-orders-app
port: 80
- matches:
- path: { type: PathPrefix, value: / }
backendRefs:
- name: foo-app
port: 80
Bar 服務路由 (bar-route.yaml)
apiVersion: gateway.networking.k8s.io/v1
kind: HTTPRoute
metadata:
  name: bar
spec:
  parentRefs:
  - name: example-gateway
    sectionName: https
  hostnames:
  - bar.example.com
  rules:
  - matches:
    - path: { type: PathPrefix, value: / }
    backendRefs:
    - name: bar-app
      port: 80
步驟三:設定 HTTPS 自動轉址
原本依賴 Annotation 的轉址功能,現在變成了一個標準化的 HTTPRoute 設定。我們使用 Gateway API 核心支援的 RequestRedirect 過濾器來達成。
apiVersion: gateway.networking.k8s.io/v1
kind: HTTPRoute
metadata:
  name: tls-redirect
spec:
  parentRefs:
  - name: example-gateway
    sectionName: http  # 綁定 HTTP 監聽器
  hostnames:
  - foo.example.com
  - bar.example.com
  rules:
  - filters:
    - type: RequestRedirect
      requestRedirect:
        scheme: https
        port: 443
        statusCode: 301
步驟四:驗證
部署完成後,我們可以使用 curl 來驗證 HTTPS 轉址與路由規則是否生效。
1. 測試強制 HTTPS 轉址
# 對 HTTP Port 80 發出請求
curl -v http://$GATEWAY_IP -H "Host: foo.example.com"
預期結果:收到 301 Moved Permanently,Location 指向 https://foo.example.com/...。
2. 測試 HTTPS 路由 (Foo Orders)
# 對 HTTPS Port 443 發出請求 (使用 -k 忽略自簽憑證檢查)
curl -v -k https://$GATEWAY_IP/orders -H "Host: foo.example.com"
預期結果:收到 200 OK,且回應來自 foo-orders-app。
3. 測試 HTTPS 路由 (Bar App)
curl -v -k https://$GATEWAY_IP/any-path -H "Host: bar.example.com"
預期結果:收到 200 OK,且回應來自 bar-app。
8. 生產環境 Gateway 的注意事項
跨 Namespace 安全性 (ReferenceGrant)
在第六章 Step 3 中,我們常看到 Gateway 設定 allowedRoutes: namespaces: from: All。這在生產環境是高風險的設定。
實務風險 若允許所有 Namespace 綁定,惡意使用者可能在自己的 Namespace 建立路由來劫持正式網域的流量。
建議設定
- Gateway 層級限制:設定為
from: Selector(只允許有特定標籤的 NS) 或from: Same(只允許同 NS)。 - ReferenceGrant 機制:若必須跨 Namespace(如 Gateway 在
infraNamespace,Service 在appNamespace),請使用ReferenceGrant進行授權。
ReferenceGrant 範例:
# ---------------------------------------------------------
# 1. Gateway 設定 (位於 infra namespace)
# ---------------------------------------------------------
apiVersion: gateway.networking.k8s.io/v1
kind: Gateway
metadata:
  name: shared-gateway
  namespace: infra     # ← Gateway 所在命名空間
spec:
  gatewayClassName: my-gw-class  # ← 你的 GatewayClass 名稱
  listeners:
    - name: http               # ← listener 名稱 (可任意命名)
      protocol: HTTP
      port: 80
      # ------------------------------------------
      # 限制哪些 namespace/app 可將 HTTPRoute attach 到這個 listener
      # ------------------------------------------
      allowedRoutes:
        kinds:
          - kind: HTTPRoute    # 只允許 HTTPRoute (如你不接受 TCPRoute/其他類型)
        namespaces:
          from: Selector        # namespaces.from = Selector → 用 label selector 選 namespace
          selector:
            matchLabels:
              gateway-access: "true"   # 只有有這個 label 的 namespace 才被允許附加 route

# ---------------------------------------------------------
# 2. HTTPRoute (在 infra namespace) — 指向跨 namespace 的 Service
# ---------------------------------------------------------
apiVersion: gateway.networking.k8s.io/v1
kind: HTTPRoute
metadata:
  name: example-route
  namespace: infra       # ← HTTPRoute 的命名空間 (同 Gateway 所在 namespace)
spec:
  parentRefs:
    - name: shared-gateway    # ← 指向上方 Gateway 的 name
      namespace: infra        # ← Gateway 所在 namespace
      # (如有多個 listener,可加 sectionName / port / hostname 指定 listener)
  rules:
    - backendRefs:
        - name: my-app-service  # ← Service 名稱
          namespace: app         # ← 指向的 Service 所在 namespace (不同 namespace)
          kind: Service
          port: 80               # ← Service 對外端口

# ---------------------------------------------------------
# 3. ReferenceGrant (在 Service 所在 namespace = app),允許跨 namespace 引用
# ---------------------------------------------------------
apiVersion: gateway.networking.k8s.io/v1beta1
kind: ReferenceGrant
metadata:
  name: allow-infra-route-to-app-service
  namespace: app  # ← 必須放在 Service 所在的 namespace
spec:
  from:
    - group: gateway.networking.k8s.io
      kind: HTTPRoute
      namespace: infra    # ← 允許來自 infra namespace 的 HTTPRoute 進行引用
  to:
    - group: ""           # <- 空代表 core API group
      kind: Service       # ← 允許被引用的資源類型:Service
      # (可選) name: my-app-service  # 若你希望只允許特定 Service 可填名稱
9. 結論:擁抱標準化的未來
隨著 2025 年 11 月 Ingress NGINX 宣布即將退役,Kubernetes 流量管理的世代交替已成定局。儘管 Ingress API 目前仍可運作,但長期的維護風險與架構限制,使得尋求替代方案成為必然。
對於新專案,Gateway API 無疑是最佳選擇。它透過標準化的 CRD 與職責分離的設計,徹底解決了過去的權限管理與移植性問題,並提供了更強大的路由表達能力,這不僅是為了因應工具的退役,更是為了升級到一個更安全、更具彈性的現代化網路架構。
參考連結
- Migrating from Ingress
- Gateway API
- Ingress
- Ingress Controllers
- https://gateway-api.sigs.k8s.io/
- Ingress NGINX Retirement: What You Need to Know
- ReferenceGrant
This Content is Authored by the writer, with AI-assisted proofreading and SEO optimization.